Pandan Sponge Cake

I love pandan cake and have wanted try make pandan chiffon cake forever but just never get the chance to do it. Originally I was planning to bake a pandan layer cake for my birthday but plan changed, didn’t really get to bake anything but end up with a mini store bought cake to share with my family. Still tempting to try the panda layer cake until I found this simple recipe from KC forum.

The cake is quite moist, soft and spongy. This is perfect to share with your friend who are lactose intolerance because it doesn't content any butter or milk. However, it has a very high contain of eggs. 8 eggs or more for the cake in this size. Don't think this something you want to eat everyday for health reason :)

This recipe is very simple and straight forward. The only downside is you have to use Sponge Cake Mix which I don’t think you can get it anyway in US. I brought the cake mix from Malaysia last Nov and I am so glad that I did.

Ingredients:
  • 435g sponge cake mix
  • 400g eggs ( about 8 eggs)
  • 100g coconut milk
  • 2 tsp sponge gel (ovalette)
  • 1 tsp pandan paste
  • PAM to coat the cake pan

Method:

  • Preheat oven to 360F
  • Grease a aluminum foil or parchment paper lined 10" cake pan with PAM
  • Using a cake mixer, beat all the ingredients together on low for 1 minute.
  • Turn to high and beat for another 12 minutes till cake mix is foam-like and very very thick.
  • Pour into cake pan.
  • Put the cake pan on a baking tray filled with about 1 cm of water. (This is the baine marie; culinary technical terms)
  • Bake in the preheated oven for 50 minutes to an hour
  • After cake is done, do not remove the cake from the oven immediately but leave the oven door slightly ajar and allow cooling for 15 to 20 mins before remove from the oven.

Japanese Soy Sauce Chicken

Found this interesting recipe from KC forum and tried it last week. The outcome is delicious especially the sauce. Besides the soy sauce flavor, it also contain the sweetness and rich flavor from the balsamic vinegar. I could be a bit bias because I love balsamic vinegar on everything. From savory dish to sweet dessert.

For this dish I used the lightly aged balsamic vinegar rather the thicken version which is best use for salad and dessert. I made couple modifications the the original recipe. I marinated the chicken ahead of time and remove the chicken from the pot once it looks tender to avoid overcook the meat. This is my adapted version.

Ingredients:

  • 8 chicken drumsticks
  • 1 cup water
  • 1/2 cup balsamic vinegar
  • 1/3 cup soy sauce
  • 2 1/2 tablespoons sugar
  • 1 clove garlic, peeled and bruised
  • 2 dried hot chili pepper

Method:

  • Marinate the chicken overnight with water, balsamic vinegar, soy sauce and sugar.
  • Place all the ingredients in a saucepan over a high heat.
  • Bring to the boil, then reduce to a simmer for about 20 minutes.
  • Increase the heat, turning the drumsticks frequently in the sauce, and cook until the drumstick is tender.
  • Remove the drumstick and continue cook the liquid until it has reduced to a sticky glaze.
  • Arrange the chicken on a serving platter and spoon the glaze over.

Whole Wheat Milk Loaf

This is my bread of the week- Whole Wheat Milk Loaf recipe taken from my previous Milk Loaf with minor adjustment.
Besides replacing the gluten flour with whole wheat flour, I also use the sweet dough function instead of the basic loaf function to get a lighter crust
The loaf come out perfect as I expected except it was almost half size smaller than the white bread. I was thinking maybe I should increase the ingredients to 1.5 more on my next loaf but this loaf is seriously quite fulfilling because of its' rich and dense texture. 2 slices of bread can actually stop me from snacking until my lunch time.
Just want to share with you my Saturday morning breakfast. Whole wheat kaya toast with a cup of white coffee. oo. wait.. It was 1/2 cup of white coffee. Try to avoid caffeine if possible but sometime I just need some coffee to get my day started.

Lettuce wrap with Ground Turkey

Since I have some lettuce head and ground turkey in my fridge, I really want to try this healthy version of lettuce wrapped from Steamy Kitchen. Unfortunately, I totally forgotten about the green apple when I was out for my groceries shopping.As a result, this is what I end up with Asian Lettuce Cups with Ground Turkey & Green Apple. I replaced the apple with 1/2 carrot and omitted the fried mung bean noodle.

Ingredients: (click here for original recipe)

  • 1 lb ground turkey
  • 1 tsp minced garlic
  • 1/2 tsp grated ginger
  • 1/2 orange bell
  • 1/2 carrot
  • 2 scallions
  • 1/2 yellow bell
  • 1.5 tbsp Hoisin Sauce
  • 1 tsp soy sauce
  • 1/2 tsp sesame oil
  • 1 tsp rice wine vinegar
  • 1/4 tsp ground pepper
Method:
  • Cut all the veggie into cube size.
  • Heat pan on high heat with cooking oil. Add ground turkey and fry until 80% done. With spatula, make room in the center of pan to fry the aromatics. Just push the meat out of the way. Add a touch more cooking oil if needed. Fry garlic, ginger, scallions until fragrant, about 10 seconds.
  • Add bell peppers and carrots Cook just a minute until vegetables are slightly softened.
  • Add sauce ingredients. Mix well and heat through.
  • Serve with lettuce cups, fried shallot and shaved carrots.
I really like the taste of the wrap, you don't really need any dipping sauce to add on like the one you get from PF Chang. The only sauce you need to kick it up a notch is probably chilies sauce is what Steamy Kitchen call it a rooster sauce. Definately thinking of giving it another try with the green apple.

Dried Oyster and Chicken Porridge

Wanted to cook something simple for another lazy Sunday afternoon and thought of the dried oyster and roast pork hock porridge my aunt used cook in Malaysia. When I was young, I don't really the dried oyster flavor except this porridge. Since I wasn't able to get the roasted pork hock, I replaced the roasted pork hock with chicken breast to make it more healthy and less oily.


Ingredients:

  • * Rice
  • * Water
  • * Dried Oyster
  • * Chicken breast
  • * Soy sauce and pepper for marinate
  • * Salt to taste
Method:
  • I marinated my chicken breast with some soy sauce and pepper for about 30 minutes and put the remaining ingredient into my rice cooker.
  • Select porridge function.
  • Serve with some green onions and diced century egg

Wake up with Light and Fluffy Pancakes

The All You Can Eat Pancakes promotion is going on at IHOP right now and I was considering going there for breakfast during the weekend. After some deep thought, I started to wonder how many pancakes can I eat at 1 time? Is it really a good deal? After all, I don't want to make myself look like a giant pancakes when leaving the restaurant. So I decided to whip up a small batch of pancakes at home for myself and my family of course, just to satisfy my craving and dream.

This recipe was adapted from Florence, Since I don't any buttermilk at home, i uses 2% fresh milk and while i am typing, i just realized i forgot to add the oil to my batter. Oh well.. it still taste good in my opinion without the oil.

Ingredients: (Click here for the original version)

  • 120g self-rising flour
  • 1/8 tsp baking soda
  • 1/8 tsp salt
  • 25g sugar
  • 190ml 2% milk
  • 1 egg
  • 1/4 tsp vanilla essence
  • 4 tbsp oil
  • PAM to coat the pan
  • Blueberries for topping ( optional)
Method:
  • Mixed all ingredients into a mixing bowl and whisk until the batter is smooth
  • Used a non-stick pan, spray a thin layer of PAM on a medium heat
  • Pour in desired amount of batter or i used 1/4 size cup over the pan and let it cook pancakes until the bubbles appear on it. You can add any topping or fruit at this point before turning the pancakes over
  • Turn the pancakes over and cook until brown
  • I serve mine with Apricot syrup and butter. Yum Yum..
This is my kiddie version for Aidan. 1/2 size smaller then the adult version, no syrup but with fresh blueberries and a touch of butter. He love it so much that he actually finish 4 of the pancakes and still asking for MORE!

Simple Mixed Veggies Stir-fry with Fishball

I have some left over napa cabbage, bean sprout and carrot sitting in my fridge for almost 1 week now, don't know what to do with them. While hubby was preparing the napa cabbage for his dish, suddenly though of the idea of combining all the left over with some cellophane noodle and fish ball. The outcome was quite delicious in my opinion. I really like veggie combination of this dish. Some crunchiness from the bean spout and the natural sweetness from the cabbage, carrot and fish ball. Yum yum.. definitely a keeper.

Kaya (Coconut Jam)

Hmm.. Kaya, one of the most famous bread spread in Malaysia. In Ipoh, you can find most of the old style Kopitiam serving homemade kaya toast with Ipoh white coffee in the morning especially at the old town area. I believe it is now become one of the tradition where you can find kaya toast in every Kopitiam in Malaysia.
Kaya reminded me a lot of old time memory. Still remember that my mom used to make kaya all the time when we were teen. She used to prepare kaya toast as our breakfast before we go to school in the early morning. To us, mommy's homemode kaya is the best. Of course during her era, making kaya was not as easy as today. I still remembered that my mom's kaya was cook using the double boiler with fresh ingredients on the charcoal burner. Fresh ingredients mean fresh squeeze coconut milk with the egg from my mom's little chicken farm. Can you imagine how good that is?
In my mind, cooking kaya is such a hassle work and I would never imagine cooking my own kaya until I found blogs talking about cooking kaya with bread machine, slow cooker or even the modern style rice cooking with multifunction. Now that I am able bake some fresh bread for my family, next goal will be cooking a nice kaya to eat with the lovely loaf.

Here's the recipe I used where from LCOM, adapted from Jo's deli.


Ingredients:

  • 3 large eggs
  • 1 1/3 cup sugar
  • 300 ml thick coconut milk
  • 1/2 tsp. clear pandan paste ( you can use any green pandan paste as well)
Method:
  • In a bowl, lightly beat the eggs until mix well
  • Put everything including add into bread machine
  • Set the machine to Jam function and let it do the rest of the job
  • The kaya will not look smooth after the cooking from the machine. Pour the kaya to a blender and blend until smooth
* When fresh from the blender, the kaya may not look as thick. Don't worry, it will get thicker as it cold down.

Since i was using the clear pandan flavor as oppose to the green pandan paste, I was surprise to see that the kaya actually looks quite greenish. Now, after storing it in the fridge, the kaya is now look more yellowish which is what i expect.

If i remember correctly, the brownish color from the traditional kaya were come from the caramel where you will have to prepare right before the kaya is ready and stir the hot caramel into the kaya mixture until well mix. Not only it gave the brownish color of the kaya but it also add extra caramel kick to it. I was so tempting to try the caramel steps but afraid i will mess up the whole kaya without consult to my mom. Until then, this is definitely one great recipe to keep.
aahh.. who want some fresh bake milk loaf with some kaya and butter on it? Me!! Now that I pass my glucose test.. I can finally indulge my lovely loaf and kaya without any guilt or worry :)

Hokkaido Milk Loaf


This is another wonderful milk loaf recipe that I would definitely keep and recommend to everyone. Another thanks to for LCOM recommending this recipe in her blog. The loaf came out lovely, soft and fluffy just like the one you can get it from most of the Asian bakery store back home.

At first I was a bit worry about the loaf getting harden without the bread improver and I was wrong.The loaf remain soft and tasty even after the 3rd days. Yum! Yum! it's all I can say about it.

Since this recipe have been try and proven by so many fellow bloggers, everyone seems to have their own way to bake the loaf and this is how my bake mine.

Ingredients (Click here for original recipes)

  • 125g whole milk (warm)
  • 75g heavy cream (warm)
  • 1/2 tsp + 1/4 tsp salt
  • 1 large egg room temperature
  • 40g sugar
  • 270g gluten flour
  • 30g cake flour
  • 5g dry yeast
  • 15g milk powder

Method:

  • Put everything in the bread machine in the order listed above or according to you bread machine instruction.
  • Set to dough function for the first 20 minutes.
  • Then set to auto program for sweet function 1.5lb with light crust to finish the rest of the baking process.
  • 3 hour later … VOILA! The loaf is ready.

30 minutes or less Instant Tofu Pudding

Bought this instant Tofu Pudding mix couple months back and finally got the chance to try it this week. The package I believed cost about $2.00 USD and it has 6 individually packed tofu pudding mix.


It is very easy to prepare and can be done in 30 minutes of less. I poured the amount of water as indicated on the package into a small pot. Bring it to boil. remove the pot from the heat and slowly stir in the powder mix until well mix. Cover the pot and wait for 15 minutes until the pudding is set.


Scoop out the pudding with my brand new tofu paddle brought my Malaysia (yes, my new toy)and it is ready to serve. No sugar syrup needed because it's all included in the package. Isn't that easy!!
As you can see the tofu texture is very soft and silky just like the one you get from dim sum place, however, taste wise just ok given that I can actually make this in 30 minutes of less. I still prefer my tofu pudding in palm sugar ginger syrup.

Korean Bean Sprout (Sukju-Namul)

While I was looking for other way to prepare the bean spout, suddenly thought of this Korean side dish we ate few months back from the Chosun Korean BBQ restaurant. I like this dish very much because it taste very light and refreshing especially when they serve it cold. So after some recipes hunting online, I found this recipe and decided to give it a shot.

Ingredients:

  • 250g green bean sprouts
  • ½ tsp salt
  • 1 tsp sesame oil
  • 1/8 tsp minced garlic
  • 2 tsp chopped green onion
  • 1/8 tsp white sesame
Method:
  • Boil some water in a pot
  • Add in bean sprouts when the water boiling. and let them boil for 2 mins
  • Drain the water. let them cool.
  • Sprinkle the salt on top, mix well and let it sit for about 3 mins.
  • Squeeze the green bean sprouts with your hands to discard the water
  • Add the remaining the seasoning sauce, and mix them well.
Verdict: Lighter than the one we had from the restaurant but overall I like it. Probably will add a little more salt or soy sauce next time to enhance the flavor a little bit.

Ok..here's how the next picture was taken. It was weekday night I prepare the dish. As you know I broke my camera few weeks ago, so I asked hubby to take a picture of the dish before he eat since I need to feed Aidan. Instead of taking the picture of the spout on the serving plate, he took the picture below. The bean sprout on his rice bowl before he took his first taste... duh! luckily got caught, other wise this will be my only picture to show off the dish hmm...

An Edible Cinnamon Raisin Loaf

Usually hubby and I will have a glass of milk with cereal for breakfast before we leave to work. This week as we ran out of milk, I decided to bake a loaf of bread with the remaining ingredient I had on hand. Cinnamon Raisin Swirl loaf has been one of my favorite bread of all time. I usually just love it eat it plain. After some googling online, I found a recipe with quite a bit positive reviews and raving about how soft the bread and flavorful the loaf is and the recipe are quite simple and straight forward. So right after I reach home from work around 6pm, I quietly prepare and load all the ingredient into the breadmachine to make sure the bread is done before my time to bed. This time I experiment my loaf with ½ all purpose flour and ½ gluten flour because I want to see what’s the end result of using all purpose flour.


3 hours later, voila.. The bread is ready. It looks ok.. the loaf is soft and raised well when fresh out from the machine. Hubby and I take a few small bites to taste the loaf and we both think that the texture of the loaf was a bit dense and does not smell as good as the milk loaf I baked few days ago. Well I do not expect the loaf to smell as good as the milk loaf as this loaf as much less ingredient compare to the one. But overall, it was ok. At least edible haa.. No recipe post for this loaf as I am not planning to keep this recipe but continue my bread baking experiment with other recipes.

Next week, I will have my GCT (Glucose Challenge Test) for to check for gestational diabetes. My friend told me to avoid taking any sweets 10 days before the test, so I can pass the test. ( I failed the 1 hour test but passed the 3 hours test on my first pregnancy). I really home I can pass the 1 hours test and skip the 3 hours test this time.. it was really a pain to stay in the lap for 4 hours and have the technician drew my blood every hour. Do you think taking less breads and cakes this week will helps? I wanted to try the sponge cup cake recipe and a panda sponge cake recipes so badly in the past few weeks and I just can’t make time to do it. Thinking of trying it this weekend, or should I wait until I pass my test?

Assam Laksa Anyone?


This is my friend J not so easy version of Assam Laksa. When you are away from home and craving for assam laksa, having a bowl of it with the taste as close as you can get it’s like heaven especially to a pregnant women like me. So I call up J last Friday asked for the recipe and invited her family come over to taste and provide me some feed back since I am going to note down exactly the amount of ingredient I put while I was cooking.

So here there are..

Ingredients:


  • 1 package of Hup Loong Assam Laksa spice
  • 2 oz belachan
  • 1 sweet yellow onion
  • 5 dried chilis
  • ½ medium size jicama
  • 1 stalk lemon grass
  • 1 ½ oz Laksa basil

  • 4-5 tamarind skins/Assam Keping
  • 3 can 6 oz tuna drained
  • 2 can 15 oz Sardine in tomato sauce
  • Soy sauce, salt and sugar to taste

Method:

  • Add belachan, onion, jicama and chilies into blender and blend until smooth paste. Note may need to add some water to get the blender running.
  • In a large pot, boil about 12 cups of water.
  • After the water is boiling, add in lemon grass, laksa basil and blended ingredients and tamarind skins, bring to boil, turn the heat to medium and let it simmer for about 30 minutes to 1 hour.
  • Add in tuna and Sardine, a little soy sauce, salt and sugar to taste.
  • Serve it laksa bee hoon garnish with some lettuce, pineapple, cucumber and red onion.

Note: This recipe can probably serve around 10 people.

Her secret ingredient of increasing the sweetness of the soup is by addition blended jicama and sweet yellow onion. I was also told that, to prepare the soup 1 day ahead to increase the flavor and sweetness from all the spices. I find it rather interesting using jicama for sweetness. Nevertheless, I love the outcome and taste.

Just like a dream comes true …

Bread or bun making has been in my to do list forever, unfortunately I am not good in kneading dough, therefore I always hold off on baking bread and bun myself. Last year, while I was shopping at Target, I saw this Breadman bread machine was on sale from $87 to $17. 75% off from the original price.. what an incredible deal right? Can’t resist myself to pass this opportunity, as a result, I bought this machine and has been sitting at home for almost 2 months now.

Right after we returned from my trip, I decided to give it a try with a few recipes.. From pandan raisin bun (too ambitious the first time) to a couple simple white bread, fully done by the machine itself, it was a total disaster. The raisin bun taste like a cake than a bun, the first white loaf I tried from the recipes come with the machine was too dry and hard right out of the machine, not to mention what’s that going to be turn out the next day.. like a rock. The 3rd recipe I tried was even discouraging.. taste like flour, and hard like a rock. It end up in my trash right after the bread was cook. What a discouraging experience huh?

Just though of returning my bread machine to Target ( since I am still within the return period), I saw this wonderful yummy green tea loaf from LCOM. Read the article and follow the thread to Happy Home Baking blog, patiently review all the wonderful comments about this milk loaf. It sound like a little fool proof recipe to me. OK… technically I still have until the end of month to return the machine, I decided to give it a try.


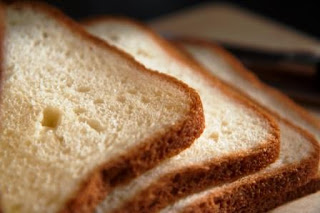
Take a look of what I got. This picture was taken the next morning. This is like a dream comes true to me… a fresh loaf of bread come out from my kitchen.

Not only the bread is soft, it is very flavorful and rich in butter flavor just like how Happy Home Baking describes in her blog. This also reminded me the Hokkaido raisin bread I brought from pavilion during my trip home. Not only the bread taste good when is fresh out from the machine, it taste as good the next day with the softer crust. I gave it light toast on the 3rd day with butter spread; it was still wonderful with a slightly crispier crust. Hmm.. yummy.

Hubby saw that I was so excited with the loaf, he decided to pinch the loaf while taking the picture to show how soft the it was when fresh from the machine :)

Many thanks to LCOM, Happy Home Baking and her reader’s review.. some motivation and encouragement on bread making… Going to try more recipes in this couple week before my return data is DUE!


Ingredient I used (Click here for link to original recipe):

  • 143g warm 2% fresh milk
  • 1 egg (room temperature)
  • ~ 38g unsalted butter (room temperature)
  • 25g caster sugar
  • 5g salt
  • 250g gluten flour
  • ~ 4g Instant yeast (since my scale only measure in 5 gram increment, so I did a rough est)
  • 1 tsp bread improver

Method I used:

  • Put everything in the bread machine in the order listed above.
  • Set to dough function for the first 20 minutes.
  • Then set to auto program for basic white bread 1.5lb with light crust to finish the rest of the baking process.
  • 2.5 hour later … VOILA! The loaf is ready.
While I was searching for bread recipe for my next creation, I saw that bread flour is actually not the same as the high gluten flour I used in this recipe. I know that most of the Chinese bread recipe call high gluten flour and I always thought bread flour = high gluten flour. After doing a little bit of research, found that they are not exactly the same in term of the protein value contain in these flour. Click here for more detail explanation. Seems like high gluten flour actually produce a more elastic effects

Most of the western bread recipe call for all purpose or bread flour. I have been using all purpose flour and bread flour for my previous baking and it was a disaster. I have seen people replace all purpose flour with bread flour or using regular bread flour for this recipe and the outcome is wonderful. This has truly make me wonder how much different will these flour made? Should I try my next bread with all purpose flour or stick with the gluten flour?

Year End Potluck Gathering

It's the end of the year and we hosted a small party at our house last weekend and invited a few of our close friend to join us for lunch. Hubby was able to capture some pictures of the food everyone contributed in the gathering.

Mini Spring Roll

Stir fry Vegetables

Cream Cheese Dip

Curry Chicken

Fry Bee Hoon and Devil Egg at the Backgroup

Orange Kiwi Seed Agar-Agar in the mold

Mix Fruit Konnyaku Jelly